Learn how to make a sourdough starter from scratch by catching wild yeast and bacteria with these step by step instructions and day by day pictures!


As you guys probably know by now, I’m a *tiny* bit obsessed with all things sourdough.
And for good reason: not only is sourdough healthier than regular baked goods, it tastes better.
It always gives me a thrill to know that I was able to raise my bread with only wild yeast and bacteria, and no commercial yeast!
I’ve made everything from bread to tortillas to waffles to Dutch babies to shortcakes with sourdough.
Turns out they’re like an enhanced version of the original recipes.
If you’d like to experience some really beautiful flavors, I highly encourage you to get into baking with sourdough!
But first of all, you need to learn how to make your own sourdough starter from scratch using my simple process!
I’ve got you covered with step by step instructions, day by day pictures, tips for maintaining your sourdough starter, a pdf recipe, and troubleshooting ideas.
This is pretty much a foolproof method if you follow my directions to a T! I’ve made a starter 3 different times using this method, so I should know! 🙂
Okay, let’s dive in and make this homemade sourdough starter!


How to Make Sourdough Starter From Scratch
It really is easy to get your starter going, I promise!
You simply mix together equal weights of flour and water, feed it regularly, and wait.
You’ll eventually get natural yeasts and bacteria to grow.
But it does take some perseverance.
And you need to follow the following guidelines carefully to get the best results.
Read through the instructions a few times and get familiar with these principals.
If you want to just skip the reasoning for why you need to use the specific ingredients and equipment and dive right into making your sourdoughs starter, you can download my free PDF recipe linked at the end of the post.
Table of Contents:


Equipment:
Before you begin, gather these items:
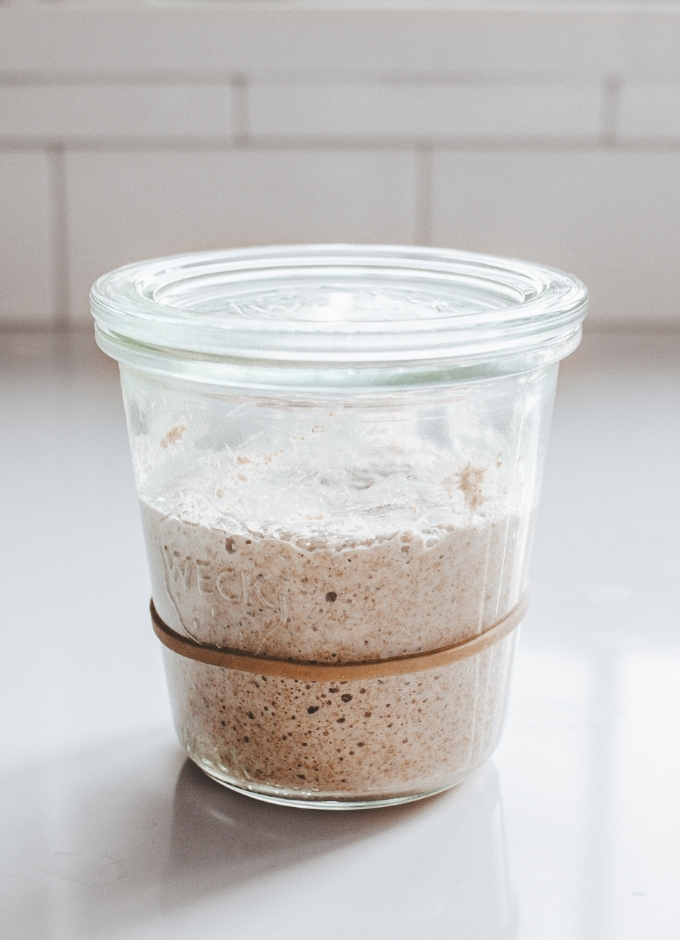
- A clean jar with a lid: I really like to use Weck jars
because they have glass lids that you can just set on top: they’re perfect for keeping bugs out, but still letting your starter breathe. But you could also use a mason jar with a plastic lid. Don’t use a metal lid since that can corrode from the acidity of the sourdough starter. You could also use cheesecloth or plastic wrap in a pinch. If your starter is consistently rising and touching the top of the jar, it may be time to move to a bigger jar.
- A rubber band or sharpie: You want a way to mark the height of your starter so you can visually see how much it has risen since feeding it.
- A kitchen scale or measuring spoons: I highly recommend using a kitchen scale to measure your ingredients because it cuts down on dishes. And it’s a good idea to have one for other sourdough recipes. However, I’ll give you volume measurements in case you don’t own a kitchen scale.
- A spatula or spoon: My favorite utensil for stirring sourdough is a spatula with a plastic handle. Sourdough is harder to clean off of wood. If you’re going to use a spoon, I recommend a stainless steel or plastic one instead of wood.
Ingredients:
You only need 3 ingredients to get your starter going:
- Whole wheat flour
- Unbleached white flour (all-purpose flour)
- Chlorine free water
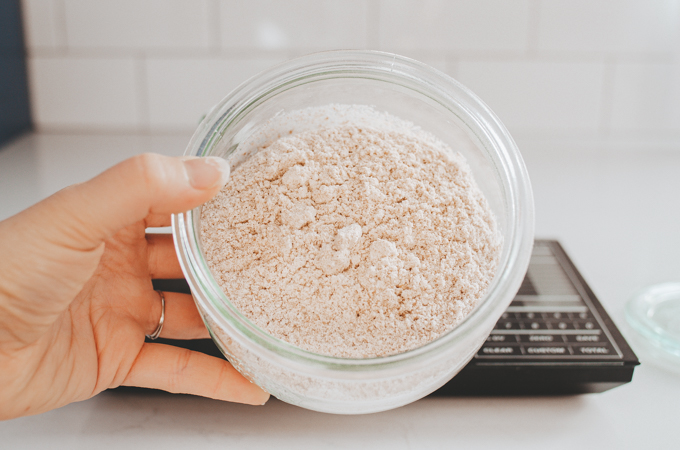

Whole Wheat Flour:
The best type of flour for getting a sourdough starter going is whole-grain flour. The reason you want to feed your starter whole grain flour is because this helps to jumpstart the fermentation. The yeast and bacteria actually really like whole grain flour, so it’s easier to get your starter going than if you use white flour.
If you have access to rye flour, I’ve heard that it’s even easier to get your starter going with that.
But whole wheat flour works well, and it’s more readily available.
Make sure to use fresh flour to avoid rancid oils.
Unbleached White Flour:
Once you’ve fed your sourdough starter with 100% whole wheat flour for a few days, you want to switch to a 50/50 blend of whole wheat flour and unbleached white all-purpose flour.
If you continue to feed your starter all whole wheat flour, you’ll need to feed it at least 2 times a day. This is because the whole grain flour makes your starter very active, so it eats up all the nutrients quickly.
By using this mixture of flour that’s half white flour, half whole wheat, you slow down the fermentation process, and thus you don’t have to feed it quite as often.
You could also use bread flour if that’s all you have on hand, but I would save your expensive bread flour for when you bake bread.
Make sure you use unbleached white flour. Yeast and bacteria don’t like bleach, so if it’s in your flour, it can slow down the whole process. Or your starter might never take off at all.
And if you can find it, it’s best to organic white flour as well. Conventional wheat is sprayed with pesticides, which might not play nicely with your starter either.
You can actually find organic flour in most grocery stores now, which makes it super convenient to source.
Chlorine Free Water:
Chlorine is another thing that can adversely affect your sourdough starter.
Think about it: chlorine is added to drinking water to kill harmful microorganisms. But it will also kill the beneficial yeast and bacteria that you’re trying to cultivate. That’s why you want to avoid chlorinated water.
You can use tap water as long as it isn’t treated with chlorine.
But if your water is treated (as most city water is), you’ll want to purchase distilled or filtered water.
Water Temperature:
Make sure your water temperature is below 110 degrees Fahrenheit (43 degrees Celsius). Otherwise the heat might harm the yeast that you’re working so hard to keep happy. 75-80 degrees Fahrenheit (24-26 degrees Celsius) is perfect.
However, I usually don’t measure the water temperature: I just make sure it’s slightly warm water, but not hot.
Water to Flour Ratio:
There isn’t one definitive right ratio of water to flour. But I keep a 100% hydration starter, so I feed mine equal weights, not volumes of water and flour, or a 1:1 ratio. In other words, I feed it 30 grams each of flour and water, not 1/4 cup each of flour and water.
House Temperature:
In an ideal world, your house would be between 75-80° F (24-26°C). But you can still get a starter going if your house is a little chillier than that. Just make sure to put it in a warm spot in your kitchen, such as the top of your fridge or next to your stove.
Why Discard?
As you’ll see in the instructions, you need to discard a portion of your starter before feeding it. Starter needs to be fed at a 1:1:1 ration of starter, flour, and water. If you don’t discard before feeding, your starter will grow at an exponential rate!
For example, if you have 30 grams of starter, you need to feed it with 30 grams each of flour and water, which will result in 90 grams of starter. If you don’t discard all but 30 grams of starter before feeding, you’ll have to feed it 90 grams each of flour and water, leaving you with a 270 gram starter. By the fourth feeding, you’ll have to feed it 2,430 grams of flour and water! That’s about 20 cups of flour!
But that discard doesn’t have to go to waste! Just keep whatever you discard in a jar, and when you’ve accumulated about a cup of starter, you can make pancakes!
Also, I recommend making a mini sourdough starter, because then there will be less to discard. There’s no reason to make a huge sourdough starter that you have to feed large amounts of your precious flour. Another advantage to a small starter is it will take up less space in your kitchen.
Stages:
When your starter is just a baby, it’s gonna go through some growing pains.
It will have an initial burst of activity, but then it will slow down or go completely quiet for a few days.
Have patience: just keep feeding it, and it should be ready to use by day 7-14!
When is My Starter Ready to Use?
You know your starter is ready to be baked with when it meets these criteria:
- It consistently doubles every 6-12 hours after being fed.
- Smells pleasantly yeasty and a bit sour.
- It passes the float test.
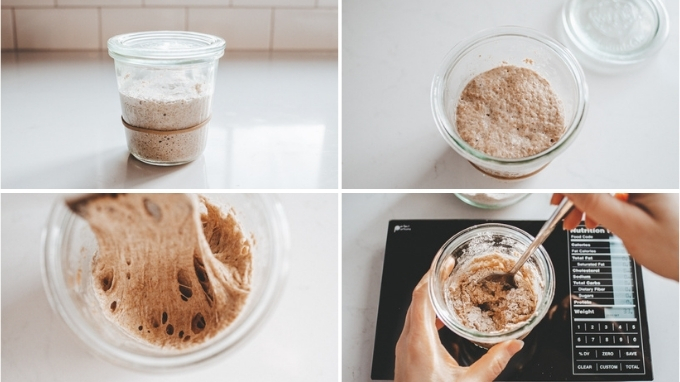
Day by Day Progression:
I thought it would be helpful for you to be able to see the full progression with day by day photos.
That way you will know what to expect while you’re getting your starter going!
Keep in mind that I live in a cold climate, and I created this sourdough starter in the winter.
If you live a warmer climate, the time it takes to get it going will be shortened.
I’ve also made a sourdough starter in the summer, and that only took 7 days, whereas this one took me 11.

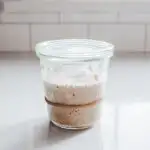
Day 1:
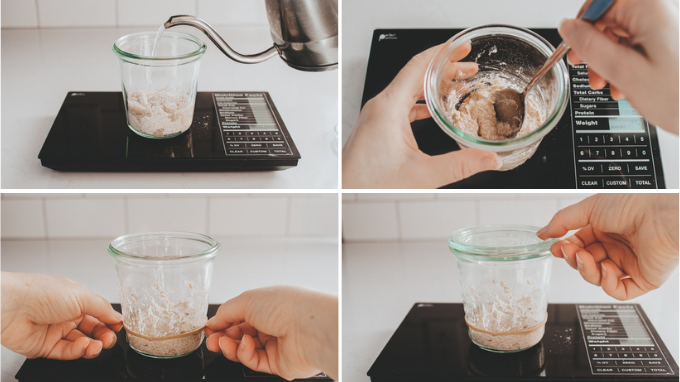
11:00 AM: – I mixed together 30 grams of whole wheat flour and 30 grams of chlorine free water in a clean glass jar.
I think using a scale is the easiest way to measure out the flour and water. But if you want to use measuring spoons instead of a scale, just use 3 tablespoons of flour and 2 tablespoons + 1 teaspoon of water.
This doesn’t make that much starter, so you save on ingredients!
Then I placed a rubber band at the height of the starter and placed a lid loosely on top of the starter.
Finally I set it aside in a warm spot out of direct sunlight.

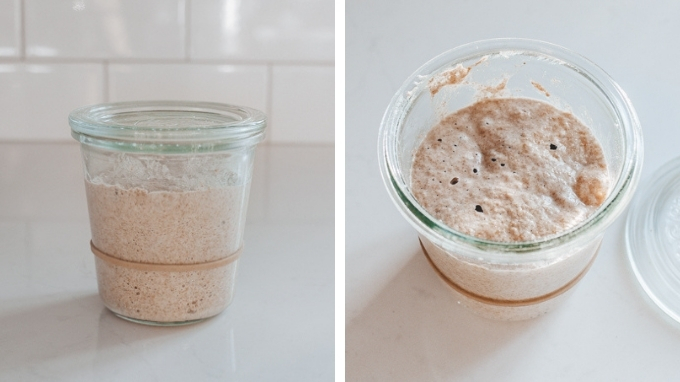
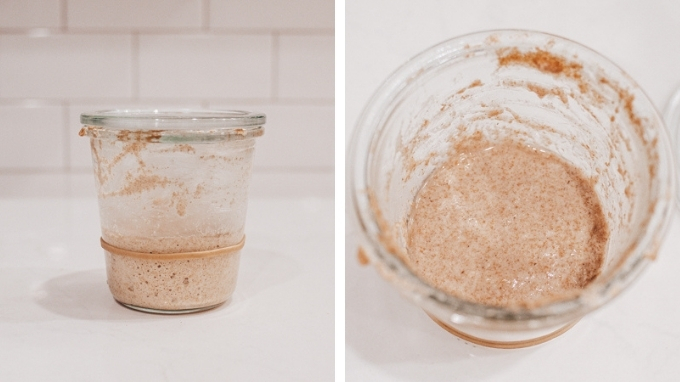
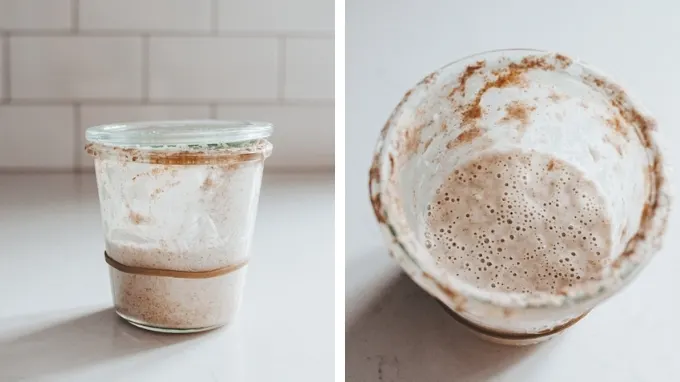
Day 2:
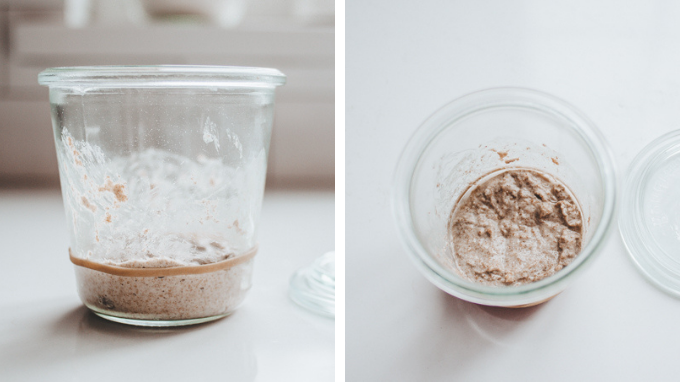
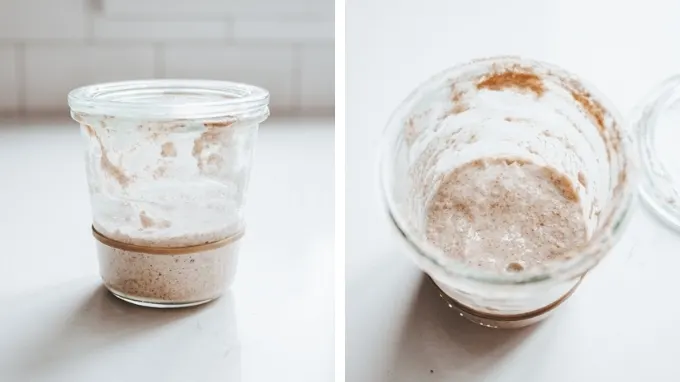
10:11 AM: (24 hours later) – The next day the starter was grey on top with perhaps a little hooch. There was no visible rise, and little to no bubbles.
I discarded all but 30 grams and fed the remaining starter 30 grams each (equal parts) of whole wheat flour and chlorine free water.
If you want to use measuring spoons instead of a scale, you can save a scant 2 tablespoons of starter instead of 30 grams.

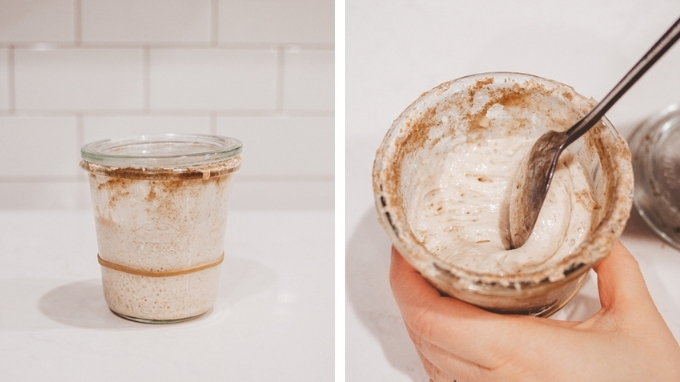
Day 3:
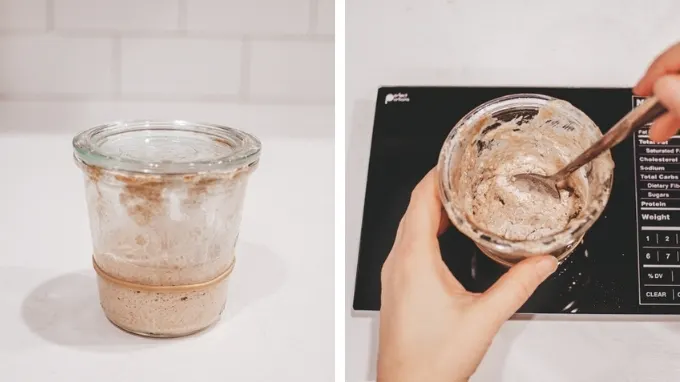
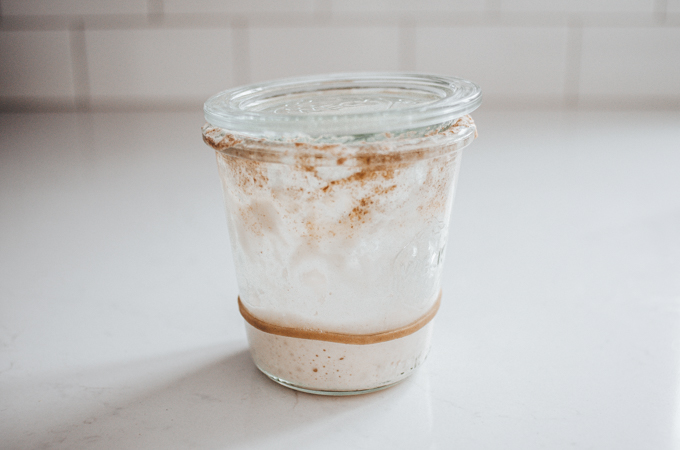
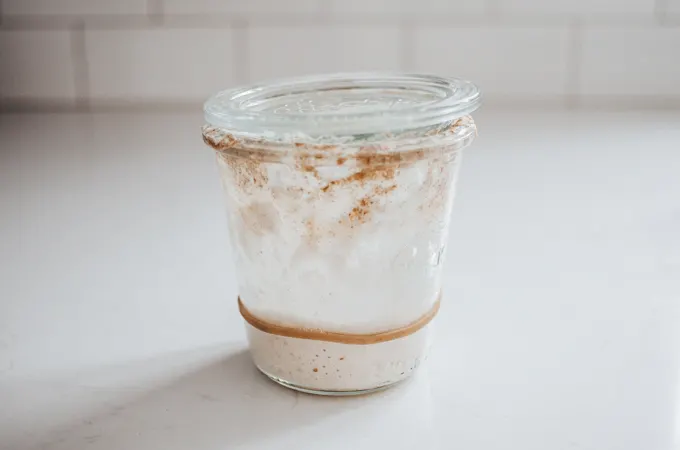
8:45 AM: (23 hours later) – The starter had doubled, was bubbly, and smelled slightly sweet, like spouted wheat. This indicated that the starter was producing carbon dioxide.
I fed it the same as day 2: 30 grams of flour and 30 grams water.
By 6:00 that evening it had doubled, but I didn’t feed it because I had a headache.

Day 4:
9:15 AM: (24 hours later) – It smelled sour, almost like yogurt, and kind of like newborn baby poo. Not a super pleasant smell, but not horribly bad either.
I fed it the same as the previous day.
9:53 PM: (12 hours later) – It had doubled, had some small bubbles, and didn’t smell quite as strong.
I fed it the same as in the morning.
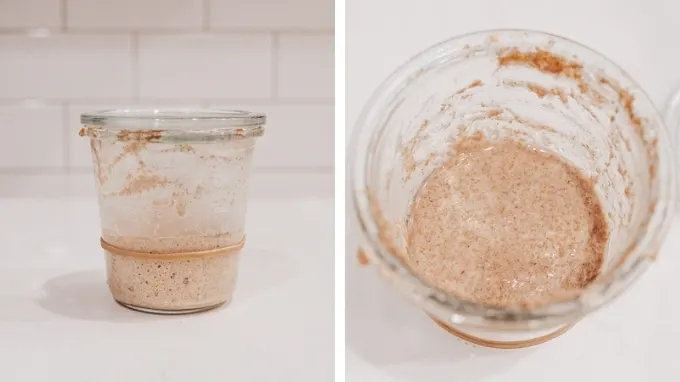
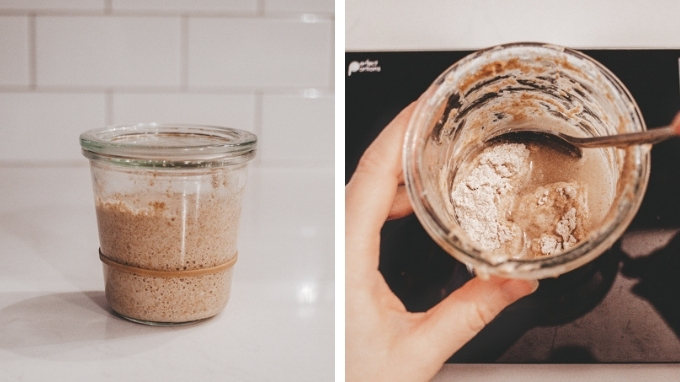
Day 5:
8:11 PM: (22 hours later) – It had only risen a little bit above the rubber band. Smelled acidic and had a bit of liquid on top.
Fed the same as before.


Day 6:
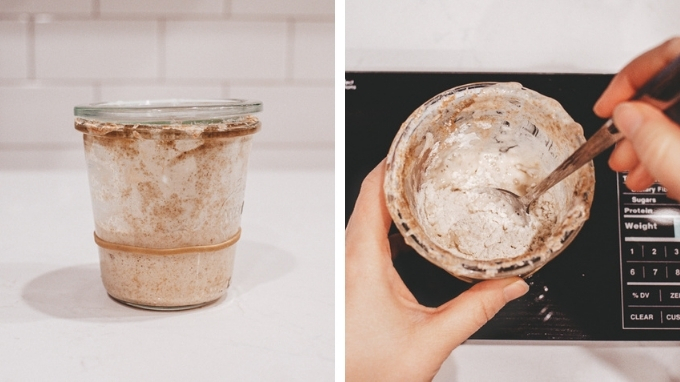
10:11 PM: (38 hours later) – Had risen a bit above the rubber band. Smelled acidic and had some liquid on top, but not a lot.

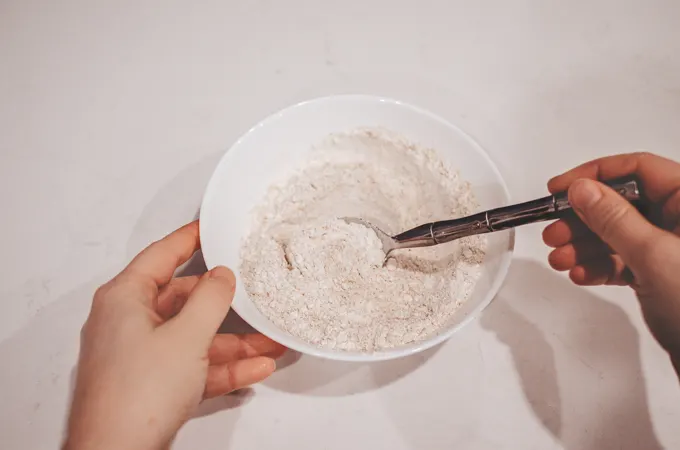
Switched to feeding it a 50/50 blend of whole wheat flour and all purpose flour.
Saved all but 30 grams, and fed it with 30 grams of the 50/50 flour blend and 30 grams of water.
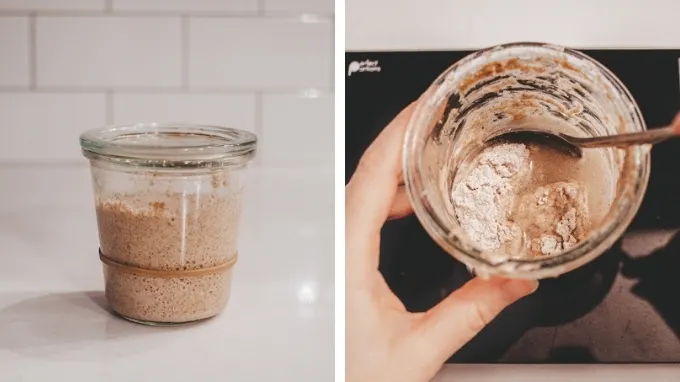
Day 7:
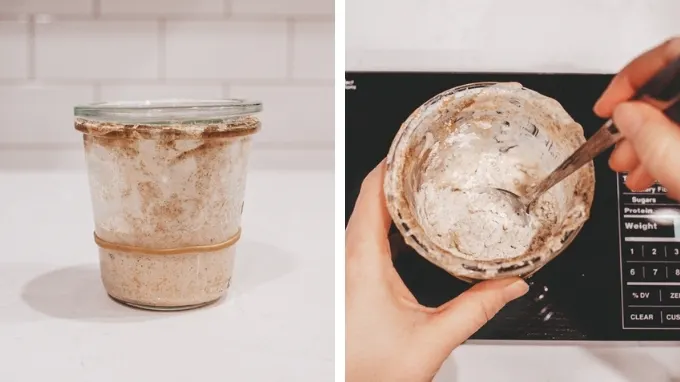
10:40 AM: (12 hours later) – Had only risen a bit above the rubber band. Smelled a bit acidic/like baby poo. There was a tiny bit of liquid on top.
Fed the same as the previous day.

10:15 PM: (12 hours later) – Had only risen a bit above the rubber band, but it was starting to smell more pleasant.
Fed the same as in the morning.
Day 8:
10:00 PM: (24 hours later) – Hadn’t risen much.
Switched to feeding all all-purpose flour.
Fed with 30 grams each of white flour and chlorine free water.
Day 9:
Just left the starter to ferment since it wasn’t very active.

Day 10:
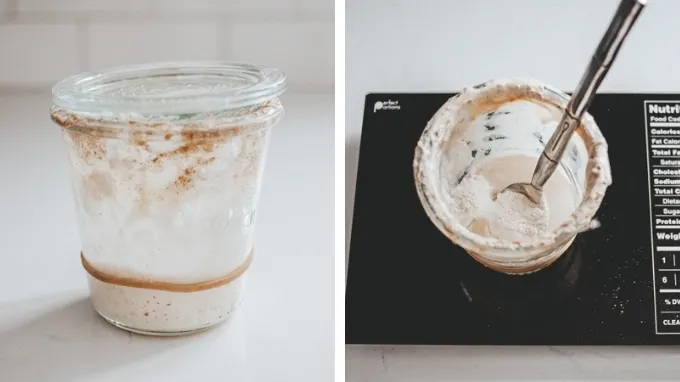
9:45 AM: Had risen by about 1/3-1/2 above the rubber band. It was starting to smell more like sourdough (pleasantly yeasty). It was pretty thin, which meant that it was quite fermented and hungry.
Fed the same as day 8.

10:00 PM: (12 hours later) – Had basically doubled. Smelled more like a mature sourdough starter.
Fed the same as in the morning.
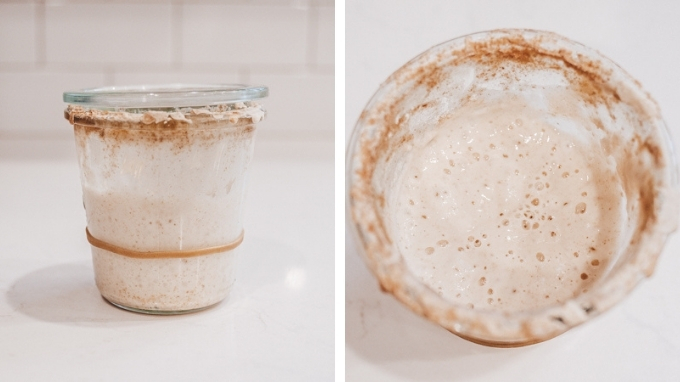

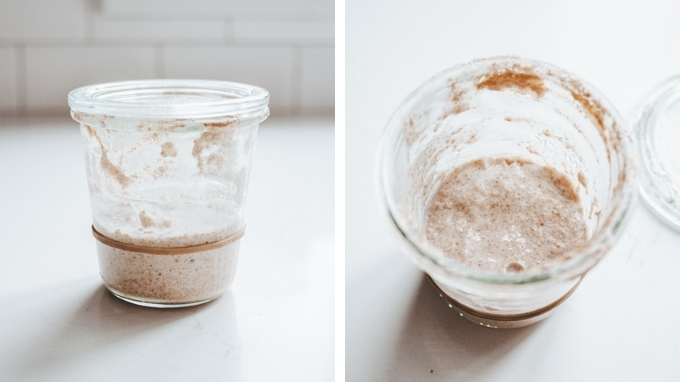
Day 11:
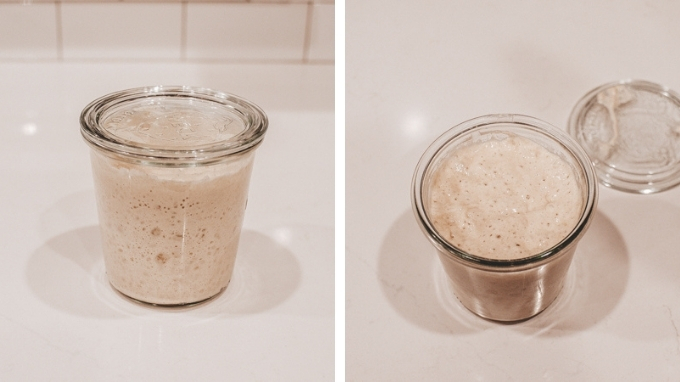
9:00 AM: (11 hours later) – Had doubled. Smelled pleasantly yeasty. Had lots of bubbles.
Fed as the previous day.

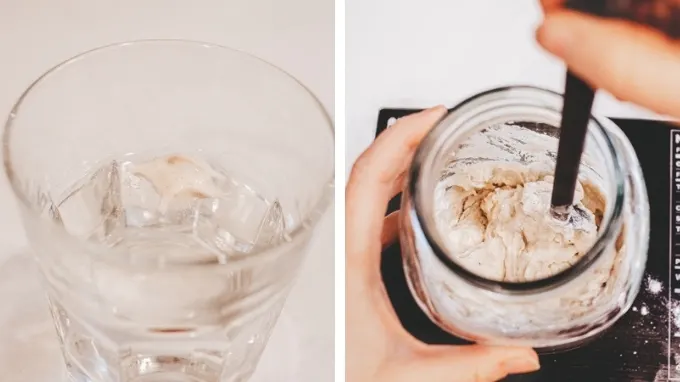
I decided to do a float test, and my starter passed! At this point I had an active starter, and it was ready to be baked with.
So I put some of the starter in a larger jar and fed it with enough flour and water to make 1 cup of starter (240 grams) so I could bake with it.
But I continued to keep the rest of the starter at room temperature and fed it at least once a day to build strength.
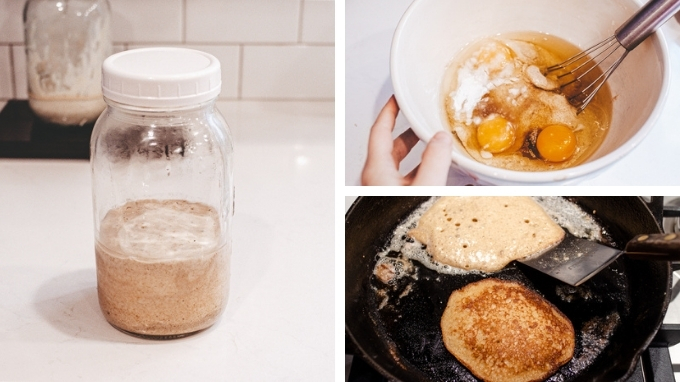

I also decided to make some pancakes with all of the discard that I have saved up in the fridge.
They were delicious!
10:45 PM: (14 hours later) – Had doubled.
Discarded all but 20 grams and fed with 20 grams each of all-purpose flour and chlorine free water.

Day 12:
9:06 AM: (10 hours later) – Had almost doubled. Smelled pleasantly yeasty and a bit sour.
Fed the same as the previous evening.
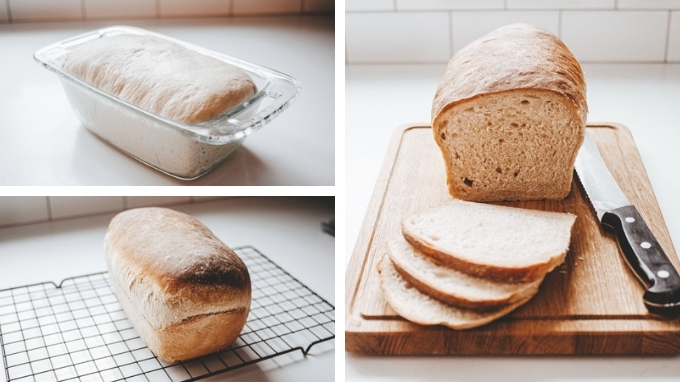
I baked a loaf of bread for the first time with this new starter, and it turned out beautifully!
This proved that I had an active, healthy starter on my hands.
I fed my starter for a few more days to build its strength before putting it to rest in the fridge.
Day 13:
9:55 AM: Had doubled and collapsed. Smelled pleasant.
Fed same as previous day.

Day 15:
Since my starter was over a week old, it was strong enough to go into the fridge.
I fed it one more time and placed it in the fridge for long term storage.

Day 22:
After the starter spent 1 week in the refrigerator, I decided to pull it out, feed it, and bake with it to make sure it survived its cold storage.
The rise looked promising, but the true test was the bake:

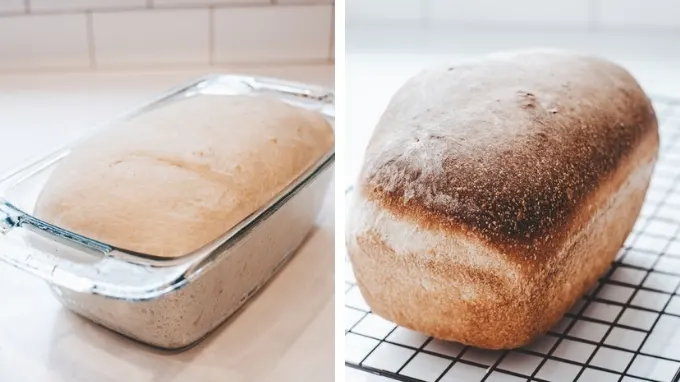
The loaf of bread baked up beautifully, so I knew my starter was mature enough to handle staying in the fridge.
Sourdough Starter Maintenance:
Once you have your starter is well established, you can move into maintaining mode.
You don’t have to keep your starter at the same activity level at all times if you aren’t planning to bake with it daily.
Feeding Schedule:
Once your starter is well established, you can get into a routine.
There are two main feeding schedules that sourdough bakers follow:
1-2 Times a Day: If you’re planning on doing a LOT of sourdough baking, you can keep your starter at room temperature or in a warm place and feed it 1-2 times a day.
If you live in a cold climate, you can get away with feeding once a day. Otherwise, if your starter is doubling every 4-8 hours, it’s going to need to be fed more than once a day to maintain good strength.
Once a Week: If you’d only like to bake a couple times a week, you can store your starter in the fridge. Make sure to feed it just before putting it into cold storage.
To use your starter from the fridge, you can refresh/revive it by feeding it at a 1:1:1 (starter > flour > water) or higher ratio.
Other Care:
Every once in a while, you’ll want to clean out your starter jar. It can get pretty crusty after a while.
I recommend simply moving it to a new, clean jar.
You could also just put it in a temporary container, thoroughly was and dry the old jar, and put it back in.
But I find that you have to soak the jar in warm soapy water for a long time to loosen the crusted-on starter. So it’s simpler to just use a new jar.
No Waste Sourdough Starter:
As a general rule, I try to keep a no waste sourdough starter. That means that I feed it just enough for my recipe, plus a bit extra. Then I feed my starter after I pour off what I need, and pop it into the fridge until my next baking day.
Keeping just a small amount of sourdough starter on hand may not be right for you if you’re baking constantly, but if you only like to bake once a week, this is perfect.
Frequently Asked Questions:
Here are some FAQs in case you run into any of these issues:
How Should Sourdough Starter Smell?
A sourdough starter is supposed to smell pleasantly yeasty and a bit sour.
If it smells like alcohol, nail polish/acetone, or vinegar, it means that it’s hungry. You need to feed it ASAP.
What’s That Liquid on Top of My Starter?!
As a starter matures, the yeast produces alcohol, which can pool at the top. This is referred to as “hooch” in the sourdough community. The good news is your starter is perfectly safe to use still, but it means that it’s hungry and needs to be fed.
Why is My Starter Runny?
If your starter gets runny, it means that it has fermented for a long time without being fed. The yeast and bacteria have eaten up a lot of the nutrients and are hungry. Make sure to feed them as soon as you can to keep them happy!
How to Make my Sourdough Starter More Sour:
This could be a post all by itself.
But in a nutshell, I find that a starter tends to have a more sour flavor when it’s more ripe (AKA it’s been fermenting longer).
So if you normally let your starter ferment for 8 hours, try letting it ferment for 10 hours before using it.
Or store it in a warmer part of your kitchen.
How to Make Sourdough Starter Less Sour:
The reverse it true for making your starter less sour.
I find that the less mature/ripe your starter is, the less sour it will be.
So make sure to use it just after it has doubled. This could be anywhere from 3-12 hours, depending on how warm your kitchen is.
If you’re having trouble with your starter doubling too quickly, try putting it in a cool place in your kitchen.
What is 1 Cup of Sourdough Starter in Grams or Ounces?
1 cup of sourdough starter weighs approximately 240 grams or 8.5 ounces. I much prefer weighing vs measuring my sourdough starter because then I don’t have to dirty up a measuring cup.
Active Dry Yeast to Sourdough Conversion:
As a general rule, 1 cup of sourdough starter = 1 packet of active dry yeast. A packet/sachet/envelope of active dry yeast is usually 2 1/4 teaspoons. However, you’ll need to remove 120 grams of flour and 120 grams of water from your recipe since you’re adding that amount in with your starter.
My Sourdough Starter Grew Mold!
If your starter grew mold, something is off. Maybe your jar got contaminated, or maybe you didn’t feed your starter often enough.
If there’s just a little mold on the top of your starter, you can scrape it off. Take a tiny bit of non-moldy starter and put it in a new, really clean jar. Feed several times before using.
But if there’s mold going all throughout your starter, it’s time to start from the beginning and make a new starter from scratch.
What is ripe sourdough starter?
Ripe sourdough simply refers to a starter that’s been fed, has doubled, passes the float test, and is ready to be used!


How to Use Your Starter:
Here are some sourdough recipes for you to try out once your starter is ready to be used!
Sourdough Discard Recipes:
Sourdough Bread Recipes:
- Healthy Whole Wheat Sourdough Sandwich Bread
- Sourdough Brioche
- Soft Sourdough French Bread Recipe
- Sourdough Sandwich Bread
- Artisan Sourdough Bread
Other Sourdough Recipes:
- Overnight Sourdough Waffles
- Sourdough Pizza Crust Recipe
- Sourdough Cinnamon Rolls
- The BEST Sourdough Pancakes
- Sourdough Tortillas
- BEST Sourdough English Muffins
- Sourdough Donut Recipe
- Homemade Sourdough Hamburger Buns
- Sourdough Pull Apart Dinner Rolls
Here’s a Video Tutorial in Case You Learn Better That Way!
Here’s a link to download my FREE Printable Sourdough Starter Recipe PDF
Sourdough Starter Recipe
Use this recipe to get your own sourdough starter going and starting baking delicious sourdough treats!
Ingredients
- 1 3/4 cups organic whole wheat flour
- 1 1/4 cups organic unbleached all purpose flour
- 1 3/4 cup unchlorinated water
Instructions
Day 1:
-
Mix together 30 grams of whole wheat flour and 30 grams of warm (no warmer than 110 degrees F) chlorine free water in a very clean small jar. Cover loosely with a lid and mark the height of the starter with a rubber band or sharpie. Set aside in a warm spot out of direct sunlight.
Day 2:
-
Discard all but 30 grams of the starter from the previous day. Add 30 grams each of whole wheat flour and water. Cover and mark the height of the starter. Set aside in a warm spot out of direct sunlight.
Days 3-6:
-
Feed and care for the starter in the same way as day 2.
Day 7:
-
Make a mixture of 30 grams whole wheat flour and all purpose flour.
-
Discard all but 30 grams of the starter. Add 30 grams of the 50/50 flour blend and 30 grams of water and mix well. Cover with a lid and mark the height of the starter. Set aside in a warm spot out of direct sunlight.
-
If your starter begins doubling after 8-12 hours, start feeding it twice a day. If there is little activity, you're safe to feed it once a day.
Days 8-14
-
Begin feeding your starter with 30 grams of unbleached all-purpose flour and water.
When is Your Starter Ready to Use?
-
If your starter is consistently doubling within 8-12 hours, smells pleasant, and passes the float test, you can start baking with it.
-
To perform the float test, drop a small amount of starter in a glass of room temperature water. If it floats, it passes the test!
Maintaining Your Starter:
-
Continue to feed your starter at least once a day until day 14. At this point you can feed your starter one last time and keep it in the fridge. Feed it at least once a week to maintain its strength.
-
Or you can continue to keep your starter at room temperature if you feed it at least once a day. It won't die if you miss a day here and there, but if you let it go too long it will lose strength.
Recipe Notes
If you live in a very warm environment, you can switch to a 50/50 whole wheat/all-purpose flour blend on day 4.
You may find that your starter is ready to be baked with after just 7 days. If it's doubling consistently within 8-12 hours of feeding it and smells pleasantly yeasty, perform the float test to see if it's ready to be baked with.
If you live in a very cool environment, it may take up to 2 weeks for your starter to be ready to baked with. Just be patient and continue to feed it regularly and it will eventually take off!
You can use 3 tablespoons flour and 2 tablespoons + 1 teaspoon of water if you don't own a kitchen scale. Discard all but a scant 2 tablespoons when feeding.
Updated on June 1, 2022
Mallory
Thursday 5th of June 2025
Hi there! My sister has had a lot of success with your sourdough technique. She referred me here and I’m happy to be on day 5 of my first starter! :)
Could you say a little more about when you decide to feed at 12 hours vs 24? Early on, it looks like the driving factor is if the starter has doubled in size by 12hrs. However by day 7, you weren’t seeing a lot of changes in your starter, but you were still feeding it every 12 hrs.?
Also how do you determine when to start incorporating all-purpose flour? Is there something you’re looking for in the starter, or it’s just always a day 5-7 shift?
Thank you for your help!
Mallory
Tuesday 10th of June 2025
@Erica Kastner, thanks for your reply! So I transitioned to all-purpose flour and it seems the starter has really stalled out (day 10 today and not much activity since feeding yesterday.) Do you ever recommend going back to whole wheat flour or the 50/50 blend? Or just keep being persistent and patient with all-purpose flour?
Thanks!
Erica Kastner
Thursday 5th of June 2025
Thanks for the questions, Mallory! It's been a little while since I made this starter, but I think I switched to 12 hours because the starter was older. I think it was actually doubling overnight and falling before I got up, so there was more activity than I thought. As for switching to all-purpose flour, if your starter seems to be active and bubbly, it's safe to start slowly switching to all-purpose flour. But if it seems really sluggish still, I would stay on the whole wheat flour for a bit longer.
Hope that helps! Erica
Mary Kate
Monday 31st of March 2025
When is the best time to feed a newish culture on (day 18) that’s consistently been doubling the past 5 days? Should I just feed every 12 hours even if it is still doubling or even tripling? I have let it go to about 15-17 hrs because that’s when I was noticing it begin to fall, however, this isn’t always conducive to convenience because it might be due to feed in the middle of the night when I’m sleeping.
Erica Kastner
Tuesday 1st of April 2025
It's okay to feed a little before or a little after peak, but it's best to not go too far outside that window. 12 hours sounds like a good about of time unless your kitchen is really warm and it's doubling/tripling hours before then. You could also try feeding it at a lower ratio (say 1:2:2 starter/flour/water), which will result in it doubling more quickly so you don't have to worry about feeding it in the middle of the night.
Mary Kate
Friday 14th of March 2025
Hi Erica, Do you discard all but 30g each day? Or is it ever a different amount? In other words, should we only ever be feeding 30 g? How does it double if that’s the case?
Mary Kate
Friday 21st of March 2025
@Erica Kastner, yes that makes sense! Thank you. I have one other question, I’m on Day 8, about to feed this morning. I switched to feeding twice daily yesterday because I was smelling alcohol-type smells, like once it smelled like whiskey, another time like running alcohol, and then this morning almost like nail polish remover. Is this normal at the 12-16 hr mark even though it’s not exactly doubling? The most I’ve seen at rise was when it was maybe a half to 2/3 above the rubber band.
Erica Kastner
Saturday 15th of March 2025
Yes, every time you feed you discard all but 30 grams. So you feed the 30 grams that are left in the jar 30 grams of water and 30 grams of flour. The doubling is what happens when the beneficial yeast and bacteria are established, and they "eat" the flour, producing carbon dioxide, which "raises" the starter. So the starter won't weigh more when it doubles, but it will double in volume, like when you're making a loaf of bread and the dough doubles. Hope that makes sense!
Amy
Friday 24th of November 2023
What are you feeding your sourdough starter with? some people use honey or sugar... or it is just flour and water that you are using to feed it?
Erica Kastner
Friday 24th of November 2023
Just flour and water!
Shannon
Friday 11th of August 2023
Hi! So I have a starter from a sourdough party I attended but I am struggling with understanding the discard. We were given starter in a small ball mason jar and made the first dough at the party. Before leaving we fed our starters a small amount and They told us if we kept it in the fridge until we wanted to use it again (and fed it once a week) it would survive. However I’ve done a few recipes now and never discard anything. I didn’t even know that was a thing.
So this is what I usually do on a baking day. I remove from the fridge and feed 1/4 cup flour and 1/4 cup water. I then let it sit on the counter all day (around 12 hours) while at work. Then do the dough when I get home. I then use 2/3 cup of the starter to make my bread recipe. So that would leave some left over. I then feed that same jar i took the 2/3 out of and put it back in the fridge. Then I feed it weekly. I don’t understand how I would have discard. If I had discard it would have no starter.
I realize I need to start using grams and a scale to measure.
Also, say I take it out for the day and plan to bake but then something comes up and I can’t. Would I just put it back in the fridge? And feed it a week from then?
Thanks for the video it was helpful! Although I’ve been doing this completely wrong I’ve been able to make a few loafs of bread and some hamburger buns!
Thanks for your help!
Erica Kastner
Saturday 12th of August 2023
It sounds like you have a well established starter that only needs to be fed once a week if kept in the fridge! Sounds like you aren't doing anything wrong! You only need to discard when you're first getting your starter going, and it sounds like you were given a starter that was already established. If you want to have extra starter, you'll just feed it more!
Discard usually refers to starter that's poured off of the main starter. It also specifically means starter that is over fermented, deflated, and no longer good for baking bread. It's best for things where you add extra leavening, such as a quick bread or pancakes.
Hope that makes sense!