These classic sourdough English muffins are light, full of nooks and crannies, and the perfect amount of tangy from the sourdough! These are similar to Thomas’ English Muffins, but they contain no commercial yeast!
Okay.
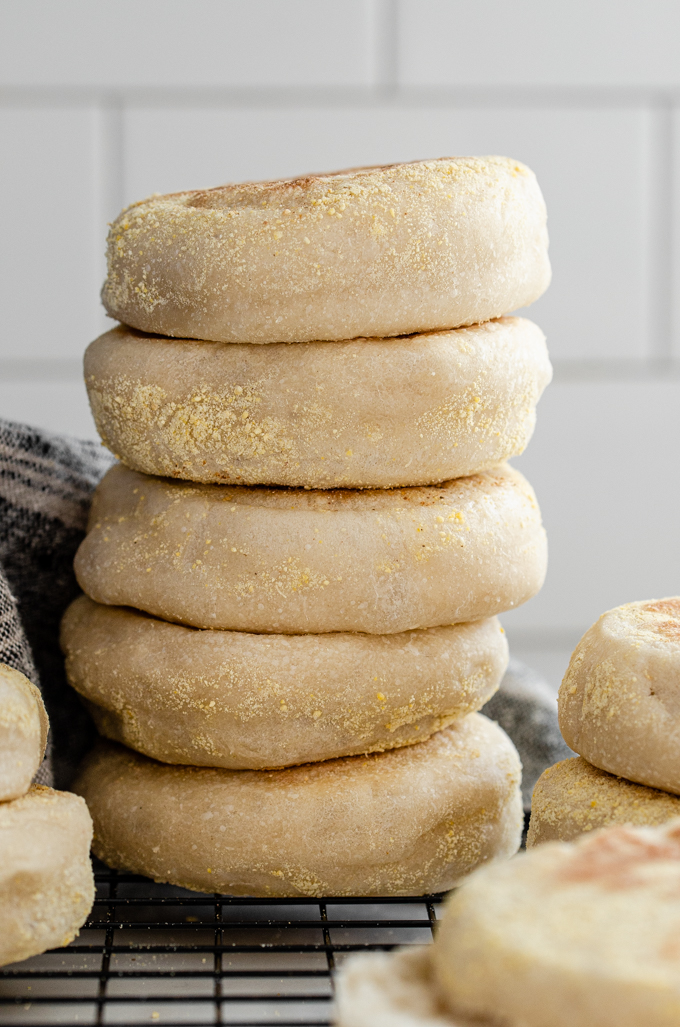
If you want to experience some of the best English muffins of your life, you’re gonna want to make these homemade sourdough English muffins.
They’re everything you’ve ever dreamed of: light, full of nooks and crannies, slightly crispy on the outside, with just the right amount of tang from the sourdough.
The first time you make them it might seem daunting. But they’re actually quite simple to make after you learn a couple of techniques.
Many homemade English muffins recipes call for an enriched dough, made with milk and eggs.
But I found that those ingredients didn’t yield the texture I was going for.
My favorite store-bought English muffins are Thomas’ Sourdough English Muffins. They’re chewy yet soft and full of flavor. That’s classic English muffins to me.
That’s the texture I was going for, and I feel like I nailed it.
NOTE: Some links are affiliate. If you click on a link and make a purchase, I will earn a small commission. This has zero impact on the price you pay, and helps out Buttered Side Up!
Ingredients:
Instead of using an enriched dough, I kept things “lighter” by using water and leaving out the typical eggs. So if you’ve had a problem with your sourdough English muffins being too dense, give this recipe a try!
- Water – make sure it’s warm but not hot.
- Honey – use just a bit here: only a teaspoon!
- Sourdough Starter – make sure it’s at its peak as described below. This isn’t the time to use sourdough discard.
- Bread Flour – To ensure good gluten development, I used organic white bread flour in my recipe. You can use all purpose flour instead, but the texture won’t be quite as good. You could experiment with adding up to 25% whole wheat flour, but again, it will affect the final texture.
- Butter – just 2 tablespoons of melted and cooled butter. I use salted butter because that’s what I have on hand most of the time. To make this dairy free, you could substitute coconut oil or avocado oil.
- Salt – I always use unrefined sea salt (such as Redmond real salt) for my sourdough recipes.
- Cornmeal – to keep the English muffins from sticking.
How to Make Sourdough English Muffins:
The process for making sourdough English muffins is as follows:
- Feed your starter.
- Mix together the dough.
- Let rise at room temp for 1 hour, then 20 hours in the fridge.
- Prepare a baking sheet.
- Shape the dough into muffins.
- Allow to rise at room temperature until puffy.
- Cook on the griddle, then finish in the oven.
- Cool for 10 minutes.
You can watch this video to see each step demonstrated, or read on for the written version.
Let’s dive in and take a closer look at the steps:
Feed Your Sourdough Starter
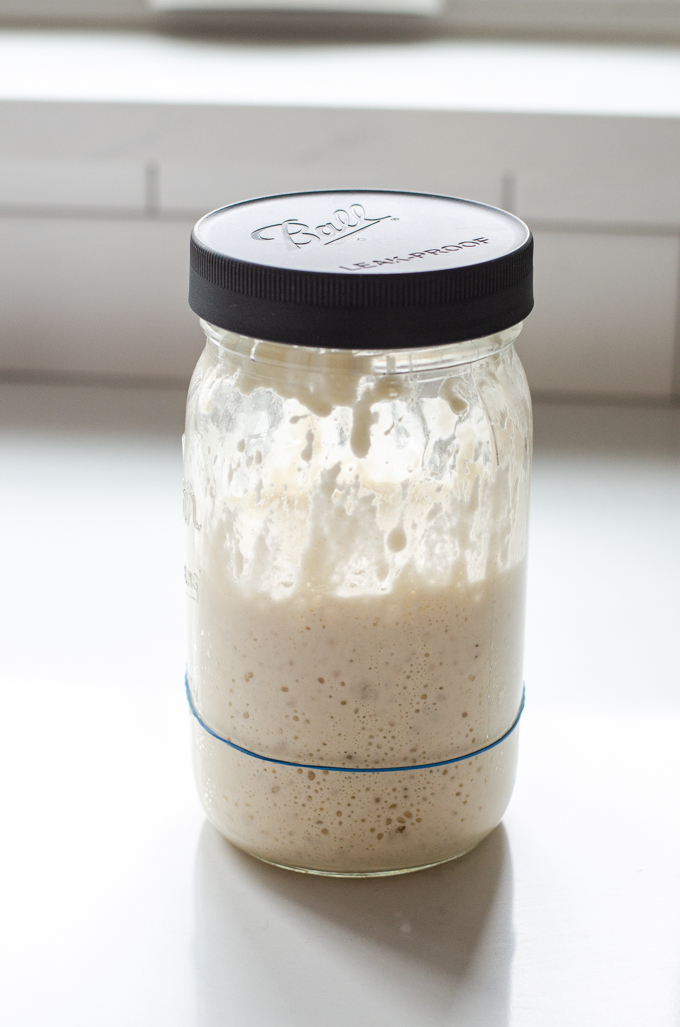
You’ll want an active sourdough starter (not discard) for this recipe. An active starter is one that’s been fed recently and is nice and healthy.
First, feed your sourdough starter 4-12 hours in advance. The amount of time it takes for your starter to “ripen” depends on how active your starter is and how warm your kitchen is.
You’ll know it’s ready to go when it has at least doubled in size, is active and bubbly, and passes the float test.
To perform the float test, simply drop a small amount of starter into a glass of room temperature water. If it floats, it passes the test!
Check out my How to Make a Sourdough Starter From Scratch post for much more info on sourdough starters!

Mix Together the Dough
Place all of the ingredients except the cornmeal into the bowl of a stand mixer.
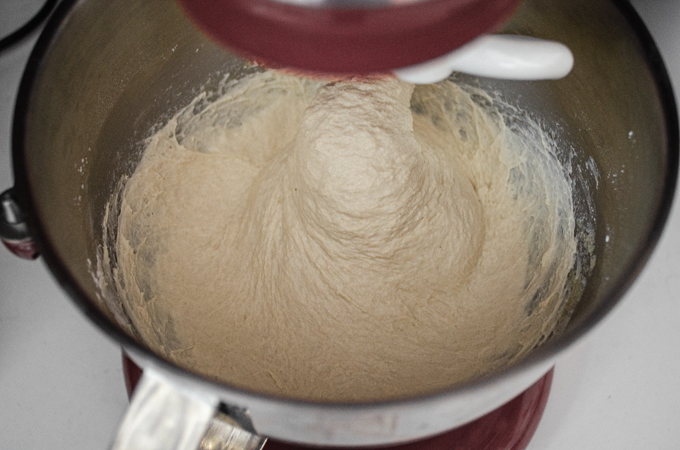
Knead on medium-low speed using the dough hook attachment for 15 minutes. It won’t quite completely clean the sides of the bowl.
Yes, this is quite a wet dough. Since it’s a sticky dough, it’s trickier to work with, but it makes the English muffins nice and light.
Now if you absolutely can’t work with such a sticky dough, you can add a little more flour. Just know that the final muffins won’t be quite as light and airy.
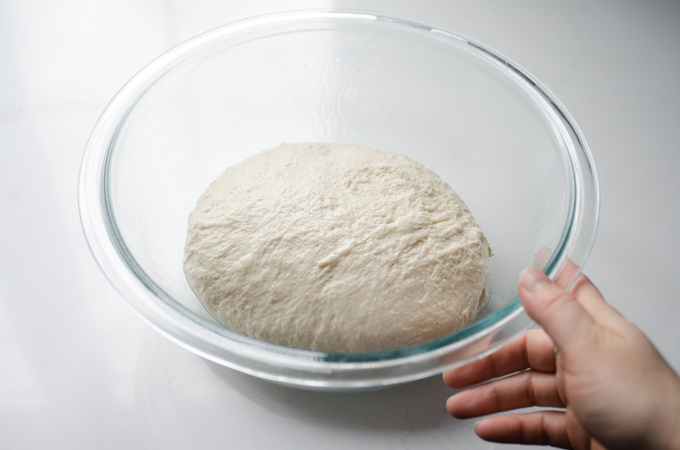
First Rise or Bulk Fermentation:
Transfer to a greased large bowl. Allow to ferment for 1 hour in a warm place at room temperature.
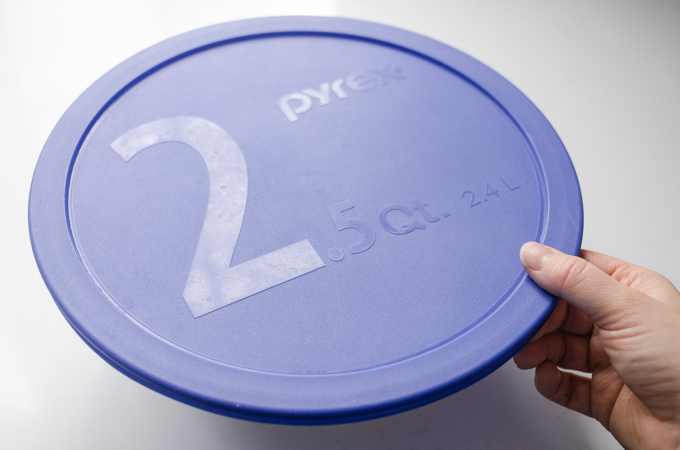
Cover and place in the fridge for 20 hours to ferment further.
I like to use lidded bowls when I ferment my sourdough, because then I don’t have to fuss with plastic wrap.

Check in on your dough the next day.
As you can see, it will rise in the fridge, but not dramatically.
Prepare a Baking Sheet
Before you shape your sourdough English muffins, you’ll want to do a bit of prep work.
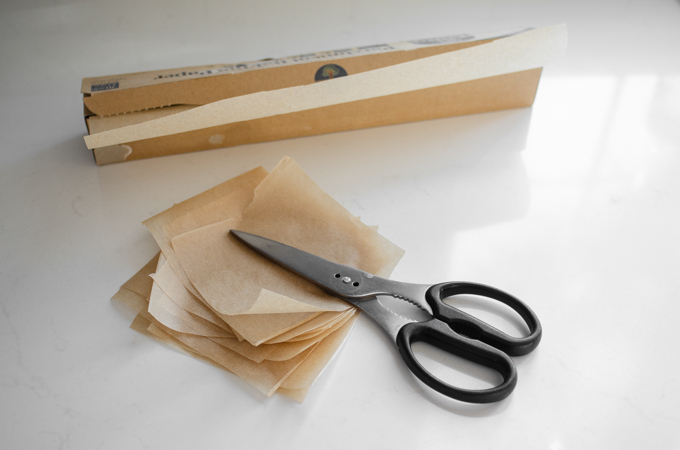
Cut out 12 squares of parchment paper that are 4 inches.
I don’t recommend using wax paper since the squares will come in close contact with a hot griddle.

Arrange the squares of parchment paper on a large cookie sheet.
Pro tip: Crumple the parchment paper squares. This is a great way to get them to lay flat.
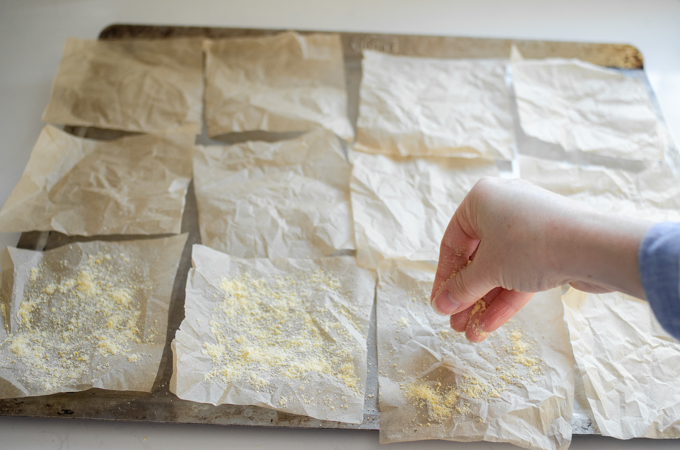
Sprinkle each of the squares of parchment paper very generously with corn meal to prevent sticking. Make sure you go all the way to the edge!
If you have any problems with sticking, you could try greasing the parchment squares first, then sprinkling them with the cornmeal.
I know, this seems tedious.
But it will prevent a lot of headache when you transfer the English muffins to the griddle/skillet.
Alternatively, you could just use one large piece of parchment paper sprinkled with cornmeal. However, it will be more difficult to transfer the risen English muffins to the griddle.
Shaping the Sourdough English Muffins:
Other recipes call for English muffin rings or a cookie cutter to shape them, but I don’t find them necessary.
I personally think the following is the best way to shape English muffins. It yields uniform, consistent results.
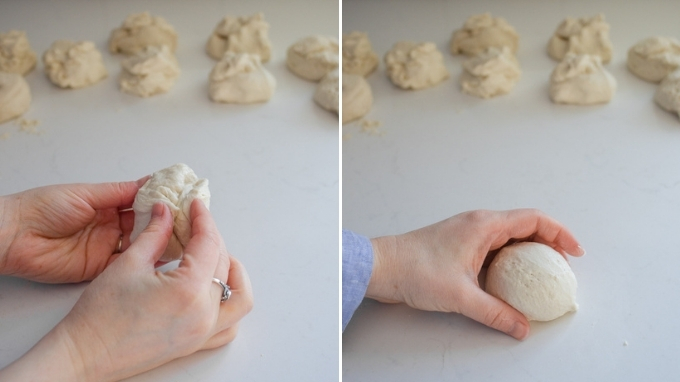
Divide the dough into 12 equal pieces.
Form each piece into a ball by pinching the edges into the middle and then rolling it across a lightly greased work surface to create tension.
Don’t use a floured surface or too much grease unless the dough is really sticking. You want it to grab onto the work surface in order to create a smooth ball.
You could also use a biscuit cutter for shaping the muffins, but I find that shaping them into balls is easier. Then you don’t have to pull out or rolling pin or grease a biscuit cutter.
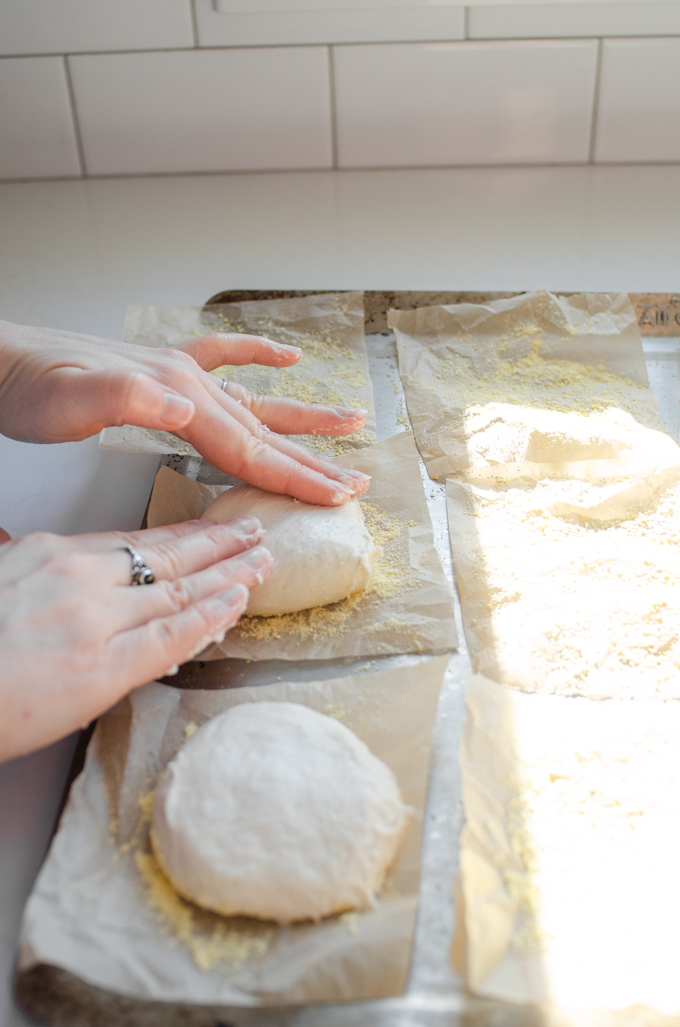
Transfer the balls of dough to the parchment paper squares on the prepared baking sheet.
Flatten them out with your fingers by pressing on the top of the dough. You may need to press them out really firmly.
Final Rise
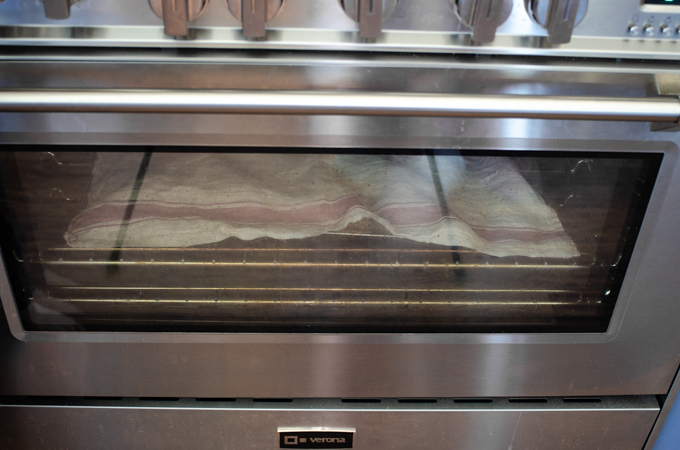
Cover with a tea towel and let the dough rest and rise until quite puffy, about 2-6 hours.
You can create a proofing box by turning your oven on to its lowest setting and immediately turning it back off.
Make sure your oven is warm, not hot, when you put the sourdough English muffins in!
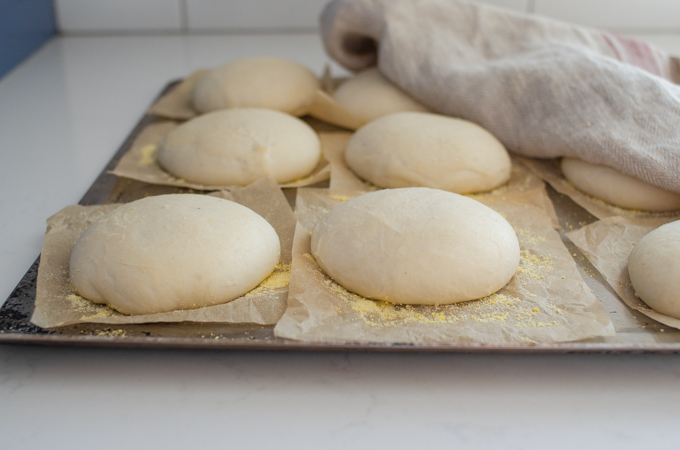
See how nice and puffy they get?
Cooking/Baking
After the second rise, it’s time to cook your English muffins!
Turn your oven on to preheat to 350°F/176°C (make sure you’ve taken the English muffins out first!).
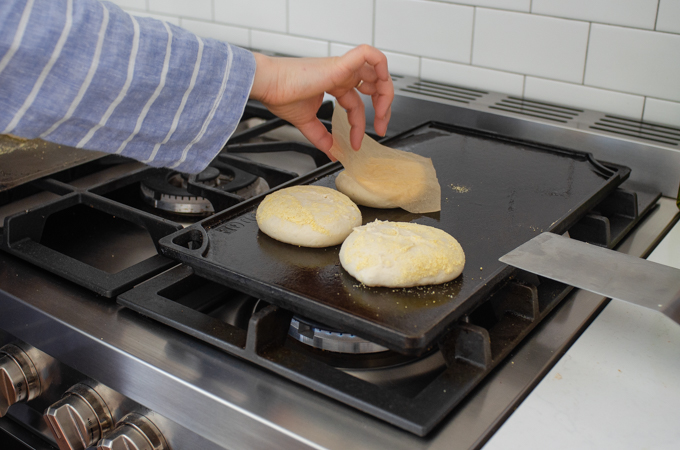
Preheat a cast iron skillet or griddle over medium-low heat for 5 minutes.
I like to use my Lodge double sided griddle for this. It easily fits 6 English muffins.
You could also use an electric griddle if that’s what you have.
Carefully invert as many English muffins as will easily fit onto the griddle.
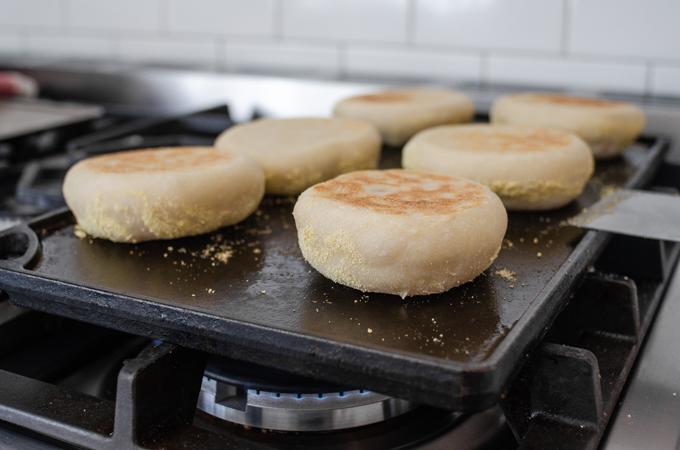
Cook for 5-8 minutes, or until nicely golden brown on the bottom.
Flip and cook for an additional 5-8 minutes, or until browned on the second side as well.
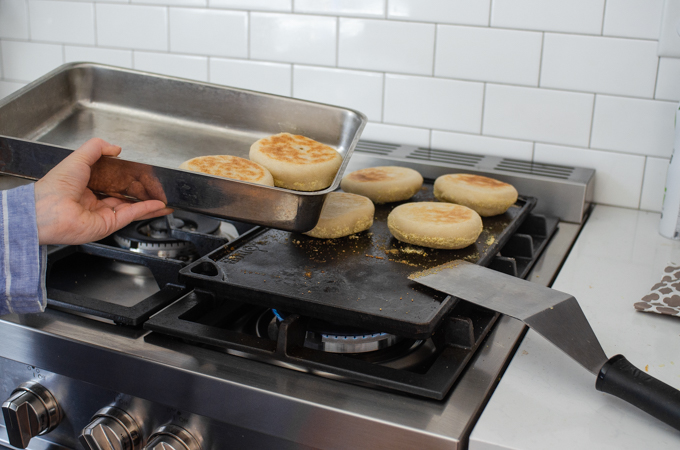
Transfer the muffins to a baking pan or sheet pan and place in the oven for 10 minutes.
This ensures that the English muffins are cooked all the way through.
If you don’t want to turn on your oven, you can simply griddle the English muffins for 10 minutes per side over low heat.
You don’t have to turn on your oven, but you aren’t quite as assured that they’ll be done in the middle. Also, they tend to get slightly burned on the bottom before they finish cooking in the middle.
And it takes a little less time to bake them off in the oven.
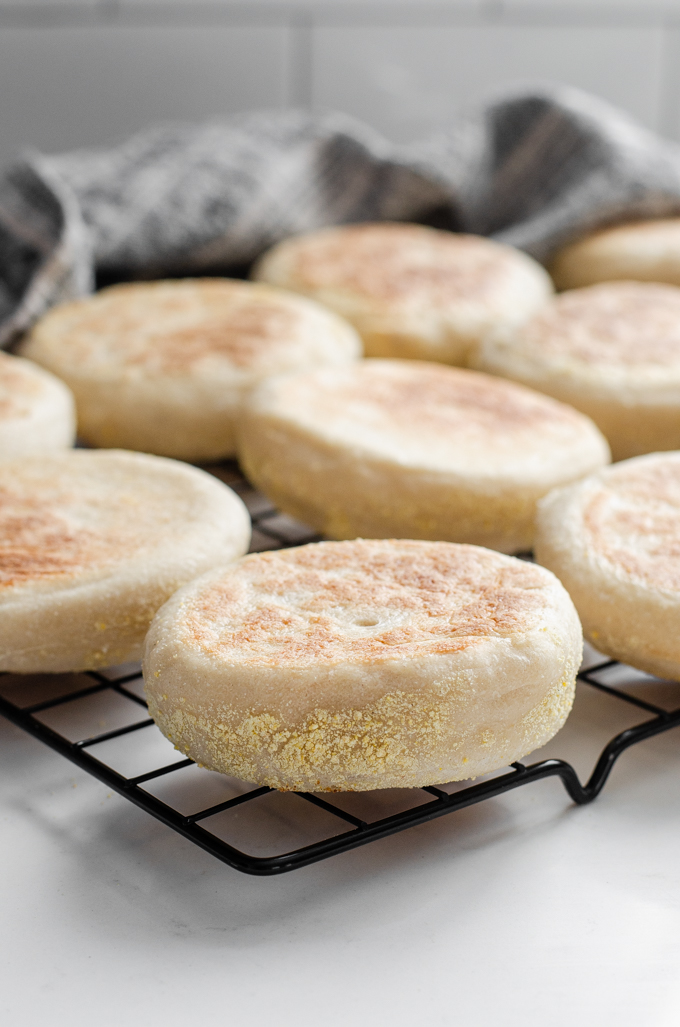
Cooling
Transfer the sourdough English muffins to a wire cooling rack. Cool on the wire rack for at least 10 minutes before slicing.

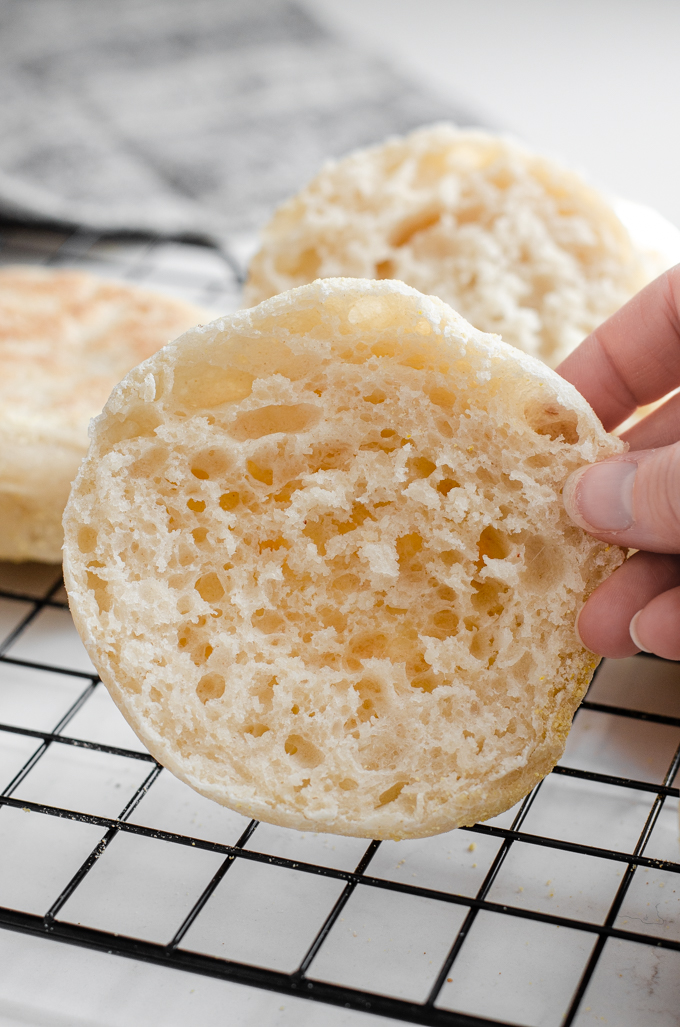
As you can see, these have plenty of nooks and crannies, and they’re quite light.
By the way, do you split your English muffins with a fork or a knife?
I personally do both, but I find that a serrated knife is much faster. The fork does give you more of that iconic English muffin look, though.
To use a fork to split the English muffin, poke it into the side of the muffin, wiggle it around a bit, and repeat all the way around.

Now, I nearly always toast my English muffins before eating them. It’s how I ate them growing up, so it seems wrong not to.
Also, let me just note that I think English muffins have an advantage over regular toast: because they’re griddled on both sides, they have a “crust” that keeps the melted butter from dripping out the bottom.
See? Do you see how much butter you can slather on without fear of it getting all over your fingers?!

A thin spread of strawberry jam on top is just perfect in my book.
Grass-fed butter + jam is about the most delicious way to enjoy English muffins in my book.
Storing:
- If you plan to eat up your sourdough English muffins with a few days, you can store them at room temperature in an airtight container.
- For longer storage, you can pop them into the fridge. They should last a week or two.
- For even longer storage, you can put them in zippered baggies and store them in the freezer. They should last about 3 months.
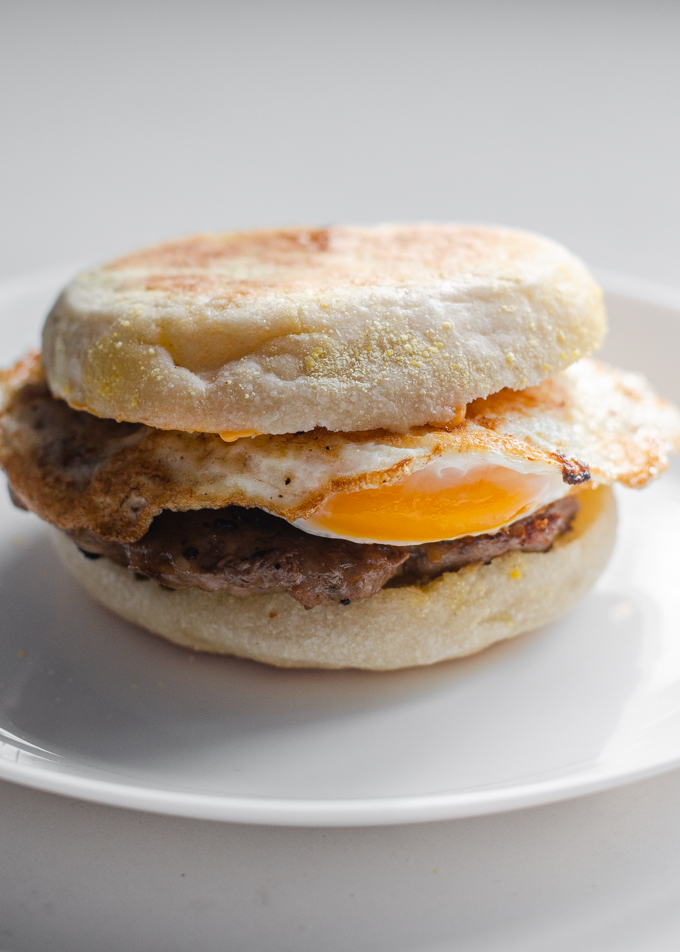
Ways to Use English Muffins:
Here are some ideas for the rare occasion when you have extra English muffins on hand:
- Make breakfast sandwiches out of them! You can do sausage or bacon for the meat, add a fried egg, and some spicy mayonnaise. So good. Incredibly good.
- Use them as the base for Eggs Benedict.
- Make mini pizzas! These English muffin pizzas from Well Plated look scrumptious.
- Use them instead of buns for Hamburgers.
- Spread them with cream cheese and jam. Mmmm…
What are some of YOUR favorite ways to use English muffins?
More Sourdough Recipes:
To get more inspiration, you can check out my Sourdough Recipes category, or browse the links below!
- Sourdough Donut Recipe
- Sourdough Hot Cross Buns
- Overnight Sourdough Pancakes
- Sourdough Brioche
- Sourdough Hamburger Buns
- Overnight Sourdough Waffles
- Sourdough Cinnamon Rolls
- Sourdough Dutch Baby
- Whole Wheat Sourdough Bread Recipe


Sourdough English Muffins
Delightfully light and airy English muffins with a bit of chew and tang.
Ingredients
- 1 cup active sourdough starter (see note) (240 grams)
- 1 cup warm water (no more than 110° F) (240 grams)
- 1 tsp honey (5 grams)
- 2 ½ cups bread flour (365 grams)
- 2 tbsp salted butter, melted and cooled
- 1 ½ tsp unrefined sea salt (5 grams)
- cornmeal, for dusting the parchment paper
Instructions
-
Place all of the ingredients except for the cornmeal in the bowl of a stand mixer. Knead on medium-low for 15 minutes.
-
Transfer the dough to a greased bowl. Cover and allow to ferment at room temperature for 1 hour. Transfer to the refrigerator and allow to ferment for 20 hours.
-
Cut out 12 four-inch squares of parchment paper. Arrange them on a large baking sheet. Sprinkle each one very generously with cornmeal all the way to the edge of the paper.
-
Divide the dough into 12 equal pieces. Form each piece into a smooth ball by pinching the corners into the middle and rolling on your work surface to create surface tension.
You can lightly grease your work surface if the dough is sticking.
-
Place each ball onto a parchment paper square, flattening with your fingers. You may need to press very firmly.
-
Cover and allow to rise at room temperature until quite puffy, about 2-6 hours. To speed up the process, you can turn your oven into a proofing box (see note).
-
Preheat your oven to 350°F. Preheat a cast iron griddle or skillet over medium low heat for 5 minutes. Carefully transfer as many of the English muffins as will fit onto the griddle. Cook for 5-8 minutes per side, or until nicely browned. Transfer to a baking pan and bake for 10 minutes.
-
Repeat with the remaining muffins.
-
Cool on a wire rack for at least 10 minutes before slicing.
-
Store any leftovers in an airtight container for up to 3 days. For longer storage, place in the refrigerator or freezer.
Recipe Notes
- An active sourdough starter is one that has been fed 4-12 hours previously, has doubled in volume, is active and bubbly, and passes the float test.
- To turn your oven into a proofing box, preheat it to the lowest setting and immediately turn it off. Make sure the oven is warm, not hot, when you put the muffins in.
- If you have problems with the muffins sticking to the parchment paper, you could try greasing the squares first, then sprinkling them with the cornmeal.
Updated on October 10, 2022
Kirk Olson
Wednesday 28th of January 2026
I just made these after searching for a recipe. I Shays bought Thomas brand muffins so this was a no breather to try. Excellent. After placing on individual parchment sheets it took my dough about 4 hours to get puffy like the photos. I had some issues getting them off the parchment - I might try pulling the parchment as well as the corn meal- it wasn’t terrible just expect some stickiness. The end result was worth it. Plenty of books and crannies for being cut open with a knife. My wife loved them- really no need for me to use any other recipe/ I recommend.
Jodi
Thursday 18th of December 2025
I love the flavor and texture of these. I have some nooks and crannies and they are chewy. The issue is that they never puffed up for the rise after I formed the muffins. I have very thin English muffins. They looked like pancake batter when I cooked them after they proofed for about 4 hours. I followed the recipe but I did have use slightly more water as the dough was dry and immediately wrapped around the bread hook when I started mixing. I added water until it looked like the consistency in the video. Could have I added too much water? I used King Arthur bread flour.
Jodi
Thursday 25th of December 2025
@Erica Kastner, did you mean at what point did I add the extra water? I added more water almost right from the beginning as the dough immediately wrapped itself around the bread hook. Should I just let it go next time and not add the water?
Erica Kastner
Thursday 18th of December 2025
Aw, that sounds frustrating! To me it sounds like a starter issue since you had trouble with the dough rising. You can check out my posts about sourdough starter here: https://www.butteredsideupblog.com/?s=sourdough+starter It could be that you added too much water which resulted in a slack dough...at what point in the kneading process did you add the dough?
Jill
Saturday 19th of July 2025
Would you happen to have the full nutrition facts for this recipe?
Elizabeth
Tuesday 25th of February 2025
I tried these. The recipe says put in frig after one hour. There’s no bulk ferment, and these were grossly underproofed. It was a fail as far as I’m concerned.
Erica Kastner
Tuesday 25th of February 2025
Hi Elizabeth! I'm sorry these didn't work out for you! So the bulk (ha!) of bulk ferment is actually done in the refrigerator. The 20 hours in the refrigerator is where the bulk fermentation happens! How active was your starter before beginning the recipe? If it was a bit sluggish, it might not have been strong enough for cold ferment.
Heather
Monday 23rd of September 2024
Hello Erica, I just wanted to tell you that I made your English muffins the other day, and my 24-year-old son came in, took one bite and said, "Oh my goodness, these are amazing.! So much better than store-bought ones." Thank you for sharing your recipe.
(I particularly like that you don't cut them out with cookie-cutters. Using cookie-cutters that leave all those loose in-between pieces never made sense to me. We either have to throw those pieces out or mash them together and ruin the texture of the last muffin. I like your way better.)